What is the BASIC Engine Shuttle?
The BASIC Engine Shuttle is a system that replaces the combination of ESP8266 processor and VS23S010 graphics chip from the BASIC Engine with an ESP32 processor module that produces the video output in software.
Advantages
The Shuttle does not require a VS23S010 chip, which many people have found very hard to obtain. It also has a lower component count in general, provides more free memory and a higher processor speed than the ESP8266-based model. The sound quality is higher, too.
Disadvantages
The Shuttle uses a process based on the DawnOfAV demo by bitluni that uses one of the two processor cores of the ESP32 to produce a video signal.
Due to hardware limitations, it is not possible to generate a fully standards-compliant signal using this approach. The Shuttle therefore does not work with all PAL TVs; issues observed include a lack of color, flashing colors, and complete failure to detect the signal. It is also not possible to produce a usable NTSC signal.
The software video generation puts a high load on the ESP32, and has very strict timing requirements. This makes it impossible to use networking or the flash memory built into the ESP-WROOM-32 module without causing severe display glitches.
Who is it for then?
If you find it impossible to obtain a VS23S010 chip, you need a system that is even easier to build than the original, that has more memory or faster execution speed, and you are willing to risk that it will not work with your current TV set (or are even prepared to shop around for a TV that works), the Shuttle is for you.
If you need a system that reliably works with every TV (including NTSC-only models), that can support networking, provides lots of (low-speed) GPIO pins, and features an on-board PSX controller connector, go for the original BASIC Engine.
Building the BASIC Engine Shuttle
|
Warning
|
The BASIC Engine Shuttle is an experimental platform. It has
limited TV compatibility. The firmware contains bugs not present in the
original BASIC Engine, and lacks some of its features. These problems may or may not be fixed (or even fixable at all). Do not build a BASIC Engine Shuttle if you are not prepared to deal with these issues. |
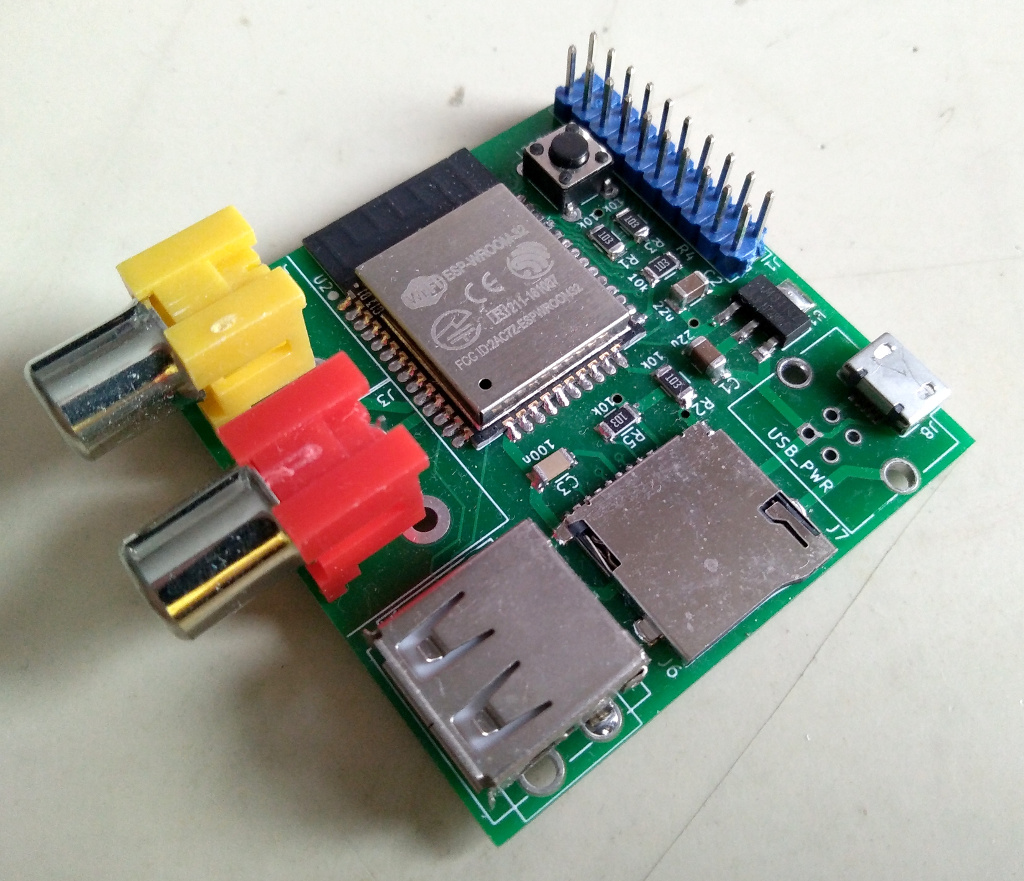
The BASIC Engine Shuttle is easier to build than the original BASIC Engine, and it does not require a separate graphics controller. It has been designed to only contain SMD components on one side, making it ideal for assembly on a stove, although it can also be soldered entirely by hand.
|
Important
|
I have never actually tried soldering a BASIC Engine Shuttle by hand because I find it much easier to use a stove. The design does not use large-pad footprints for the passive components because they were difficult to fit, which might make hand-soldering a bit tricky. |
Before you get started, you will have to get your hands on the required parts and tools.
Components
The BASIC Engine Shuttle does not use any obsolete or exotic components that may be difficult to obtain. Nevertheless, you will have to put in at least two orders to get all required parts.
I would recommend to get the circuit board from JLCPCB or Smart Prototyping, and all other parts from AliExpress. AE usually has the lowest price, and this project is all about the cheap.
You will usually have to order more components than you actually intend to use, because
-
they are only offered in larger quantities,
-
you may want to save on shipping in case you decide to build more Shuttles,
-
you are likely to break or lose a few parts while building the device, or
-
all of the above.
|
Note
|
Unless noted otherwise, all links lead to suppliers and components I have bought myself in the past and that have received the "Good Enough for BASIC Engine" seal of approval. Nevertheless you order at your own risk, and I cannot be held responsible for the quality of the services or products provided to you. I am not affiliated with any of the linked suppliers. |
Required components
| Qty | Name | Package | Where to get it | Links |
|---|---|---|---|---|
1 |
Circuit Board |
Any board house |
||
1 |
ESP-WROOM-32 microcontroller module |
AliExpress, eBay, Amazon, various smaller retailers |
||
5 |
Resistor 10K |
1206 |
Generic part |
|
1 |
Capacitor 100nF |
1206 |
Generic part |
|
2 |
Capacitor 22uF |
1206 |
Generic part |
|
2 |
RCA connectors |
THT |
Generic, but often overpriced part |
AliExpress: 1 (untested supplier); no longer available: red, yellow |
1 |
Micro-USB connector |
SMT |
Generic, but often overpriced part |
|
1 |
Regulator AMS1117 3.3V |
SOT-223 |
Generic, sometimes overpriced part |
AliExpress: 1 |
1 |
USB A connector (keyboard connector) |
THT |
Generic part |
|
1 |
Pin header 2x10 pins (expansion/programming connector) |
AliExpress recommended for price |
AliExpress: 1 (2x40 headers, cut them in four pieces) |
|
1 |
MicroSD socket |
SMT |
AliExpress, eBay |
|
1 |
Push button 6x6x4.3 mm (reset button) |
THT |
Generic part |
Alternative components
If you don’t like the flimsy Micro-USB power socket or that new-fangled USB keyboard connector, you can fit your BASIC Engine Shuttle with these parts instead:
| Qty | Name | Package | Who can supply it | Links |
|---|---|---|---|---|
1 |
PS/2 keyboard connector (female) |
THT |
AliExpress, some distributors |
|
1 |
USB type B power socket (female) |
THT |
Generic part |
AliExpress: 1 (untested) |
Ordering the PCB
If you have never had a custom circuit board made, you may find the multitude of options you are presented with on the board house’s ordering page confusing. The good news is that you do not have to worry about most of them, because they have been set to reasonable defaults already.
If you order with JLCPCB or Smart Prototyping using the links above, all you have
to do is upload the ZIP file containing the Gerber files
that you can find on Github in the PCB repository’s
release section (shuttle-gerber-<revision>.zip) and specify the dimensions of the board (50x50 mm).
All other options can be left as is.
(Just to be on safe side: At the time of writing these options were: 2 layers, 1.6 mm thickness, HASL with lead, 1oz copper weight, material FR4.)
Tools required
If you have no equipment, these are the items you will need to obtain:
Soldering tools
-
A stove or hot plate.
-
Temperature-controlled soldering iron (recommended: generic 937D+ or similar device from eBay).
-
Solder wire (0.5mm with rosin core).
-
A set of pointy-tipped tweezers. (You only need one, but they are cheap, and this way you can find out which style you like best.)
-
Reading glasses (if above 40).
Assuming that you already have a stove or hot plate (and reading glasses, if required), these tools should not set you back more than fifty euros.
|
Warning
|
If you watch too many YouTube videos, you may come across a
substance called "solder paste". Stay away from it. It is intended to be
used in mass production, and is entirely useless when building things by
hand, especially if small-pitch components are involved. It also gets into every crack and stays there for weeks, while still managing to "go bad" if not stored properly. Oh, and have I mentioned it’s poisonous? Just stay away from it. |
Programming tools
These are used to flash the firmware into the microcontroller module.
| Qty | Name | Package | Who can supply it | Links |
|---|---|---|---|---|
1 |
USB-to-serial converter |
AliExpress, eBay |
||
7 |
Dupont wires female/female (for wiring the converter to the programming header) |
AliExpress, eBay |
AliExpress: 1 (untested supplier), 2 (untested supplier) |
You also need some sort of computer running a Debian-derived Linux distribution. Using a different system is not impossible, but will require extensive modifications to the firmware build scripts.
Assembly
Unfortunately, there is currently no video showing the assembly of the Shuttle, but the basic procedure is as follows:
-
Coat all SMD pads on the PCB with a thin layer of solder, in the same way shown in the Soldering up the BASIC Engine video for the fine-pitch SMD chips.
-
Dab flux on each pad. Place the PCB on a cold stove top, then place all SMD components on their pads.
-
Turn the stove to low heat, and increase it slowly over the course of a few minutes, until the solder starts to melt.
-
As soon as all the solder has melted, turn the heat off.
-
If there are components that look skewed, you can push them around with tweezers. Don’t be a perfectionist; as long as there is contact between the part and all pads and there are no shorts between pads, leave things as they are, or you risk needlessly introducing problems.
-
If components are not flush with the PCB, you can (very gently) tap on them with tweezers. Be sure not to apply any lateral force when doing so.
-
Use tweezers to pull the PCB off the stove and let it cool down.
-
Use the soldering iron to add the through-hole components.
PCB Errata
There are no known issues with the BASIC Engine Shuttle revision 0 PCB design.
|
Warning
|
The USB type B power connector and the PS/2 keyboard connector have not been tested yet. (Micro-USB power and USB keyboard connectors have been verified.) |
Expansion/Programming Connector pinout
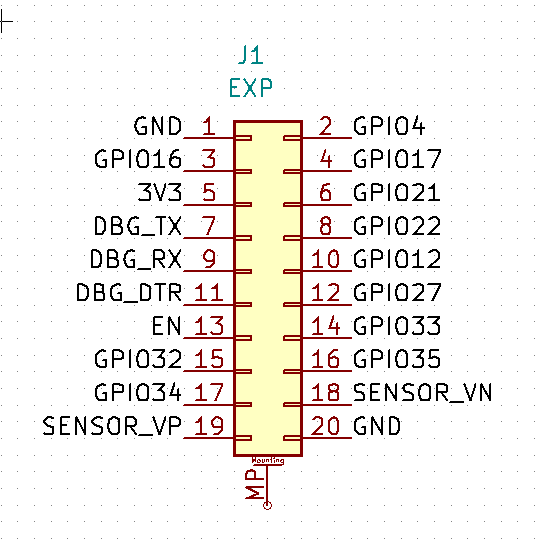
To program the BASIC Engine Shuttle firmware, wire your USB-to-serial converter to the expansion connector as follows:
| Shuttle pin | Converter pin |
|---|---|
GND |
GND |
DBG_TX |
RX |
DBG_RX |
TX |
DBG_DTR |
DTR |
EN |
RTS |
Software installation
Firmware
Currently, there are no firmware releases available for the BASIC Engine
Shuttle. There are, however, nightly
firmware builds compiled from the current Git master branch. Look for files
named basicengine_shuttle-firmware-...
To build and install the firmware yourself, you have to clone the
BASIC Engine firmware repository
and run the following commands in the basicengine-firmware directory:
|
Important
|
These instruction assume that you run a Debian-derived Linux distribution (Debian, Ubuntu, Linux Mint or similar) on an AMD64 or ARM64 workstation. |
|
Warning
|
This process downloads a lot of data from the Internet and consumes a lot of CPU time and disk space. |
-
make esp32to download and compile the toolchain, ESP32 SDK, and BASIC Engine Shuttle firmware. -
make upload_esp32to upload the binary to the Shuttle.
Sound font
The sound font file 1mgm.sf2
must be copied to the SD card or the internal flash memory for wavetable synthesizer
sound to work.
Schematics
BASIC Engine Shuttle rev0 schematics in PDF format